blog
Step-by-step guide to contributing custom security rules to the Puma Scan Community Edition open source project using Roslyn analyzers.
Are you looking for an open source project to contribute to? Are you interested in secure coding, or the .NET Compiler Platform, known as Roslyn? Or are you just bored? Whatever the reason, the following tutorial will get you started on adding your own rules to the Puma Scan Community Edition ruleset.
At this point you may be thinking, what rule should I write? The first place to look is the issue backlog on Puma Scan Community Edition github repo. A fellow user or contributor may have already requested a specific rule that would be perfect for you to dive into. You could also draw inspiration from a recurring bug at your nine to five job. Alternatively, if you want to test drive writing a rule, think of a particular coding style that you’d like to adhere to.
To start, make sure you have the required software and components installed. The Puma Scan rules engine references version 2.9 of the Microsoft Code Analysis libraries which require Microsoft Visual Studio version 15.8.
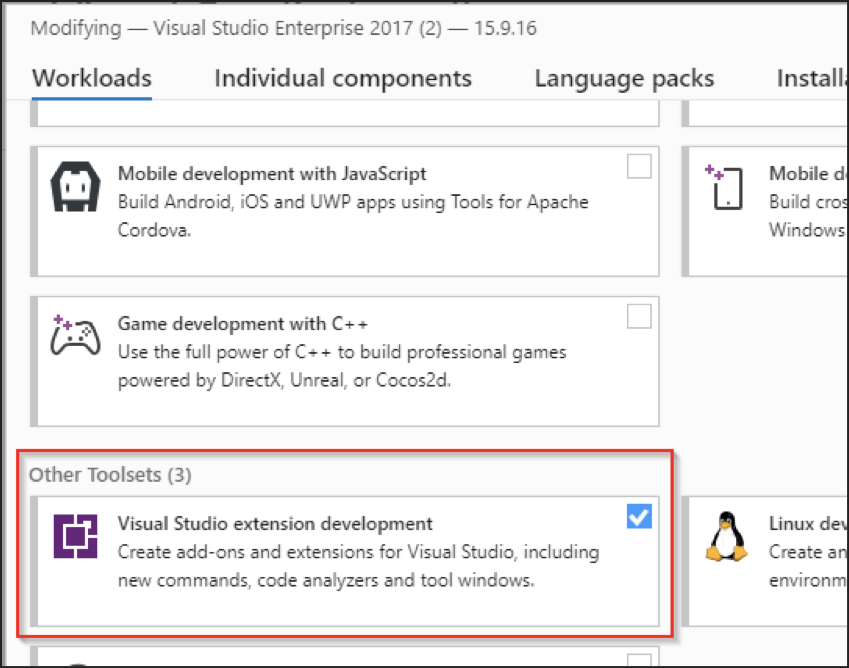
Additionally, since Puma Scan can be run as a Visual Studio Extension, you will want the extension development workload installed. If you don’t have it, fire up the Visual Studio Installer application and locate the Visual Studio extension development workload in the Workload section of the Modify/Install window.
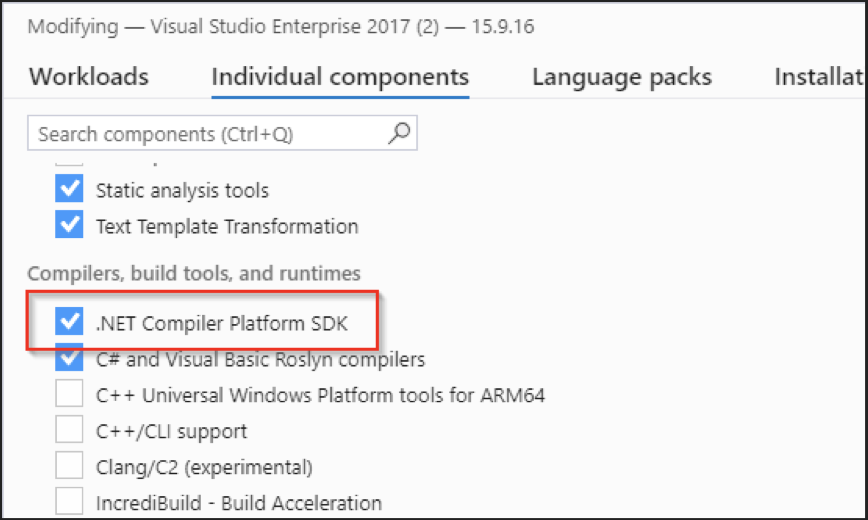
Lastly, you’ll need to install the .NET Compiler Platform SDK. If you don’t have it, open the Visual Studio Installer application and locate it within the Individual Components section of the Modify/Install window.
If you haven’t done so, you will need to clone the Puma Scan Community edition repository located here. If you are new to git or github.com, there are plenty of resources available to get you up and running.
For this tutorial, let’s tackle writing a security rule for ASP.NET’s HyperLink control. The Text property is not automatically html encoded to prevent a cross site scripting vulnerability. If a malicious user was able to control the value of the property, he/she could:
attack the site to run arbitrary code to hijack a user’s session
perform actions on behalf of a user
steal sensitive data
This is why we’d like Puma Scan to warn us when a HyperLink’s Text property is not properly encoded.
In order to develop our new rule, we’ll be modifying or creating five code files. This includes:
The first file we need to create is the analyzer. This will house logic to determine if the current node matches the semantics and syntax of a vulnerable node. Once a vulnerable node is found, it will be added to the collection of vulnerable nodes for Puma Scan to report it to Visual Studio. Puma Scan’s code has already done some of the heavy lifting for you.
You will need to decide which base class and interface best suits the rule you are trying to write. The base classes and interfaces that Puma Scan includes are:
Since we are analyzing the use of the HyperLink control, we want to use the BaseCodeBlockAnalyzer to find controls of a certain type (semantics) and examine their use (syntax). Specifically we want to see what kind of data is being assigned to the text property of the HyperLink control.
We are going to create a HyperLinkTextAnalyzer class that inherits from BaseCodeBlockAnalyzer and implements the ISyntaxAnalyzer interface.
internal class HyperLinkTextAnalyzer : BaseCodeBlockAnalyzer, ISyntaxAnalyzer
 {
        public SyntaxKind SinkKind => SyntaxKind.SimpleAssignmentExpression;

        public override void GetSinks(SyntaxNodeAnalysisContext context, DiagnosticId ruleId)
        {

        }
 }
The ISyntaxAnalyzer interface forces us to implement one property and one method. The property, SinkKind, is a Roslyn enum that filters the analyzer to only examine certain types of nodes.
In our analyzer, we want to analyze assignments to the HyperLink’s Text property. Therefore, we can use the SimpleAssignmentExpression enum value. The complete list of the SyntaxKind enum values can be found here. https://docs.microsoft.com/en-us/dotnet/api/microsoft.codeanalysis.csharp.syntaxkind?view=roslyn-dotnet
The method, GetSinks, will determine if the current block of code matches the vulnerability we are looking for. If it does, it will add it to the base classes’ collection of vulnerable syntax nodes.
Additionally, Puma Scan’s analyzers break out the work of examining the syntax nodes by executing the IsVulnerable method on an expression syntax analyzer. This step is optional, and all the logic could be thrown in the GetSink’s method. However, it’s preferred if the expression analyzer is created and the logic is broken down into smaller pieces to limit the responsibilities of each class.
The expression syntax analyzer class contains a method to analyze a specific type of syntax node. We defined the SyntaxKind that we were analyzing above in the HyperLinkTextAnalyzer.
The appropriate ExpressionSyntax type for a SyntaxKind of SimpleAssignmentExpression is an expression syntax of type AssignmentExpressionSyntax. Therefore, we can create an interface that our expression syntax analyzer must implement and matches a signature of…
bool IsVulnerable(SemanticModel model, AssignmentExpressionSyntax syntax, DiagnosticId ruleId);
The SemanticModel parameter contains methods and properties that allows you to determine the type of a certain node. For example, is a node an integer?
The DiagnosticId parameter is the ID of the rule. It’s used by helper methods that Puma provides. It’s currently not utilized much in the Community edition.
The goal of the IsVulnerable method is to return whether the supplied AssignmentExpressionSyntax node is an assignment to the Text property of a HyperLink control. When examining the syntax node, we need to keep performance in mind. Puma Scan is continuously running while you type code. Therefore, you want to make sure to write logic as efficiently as possible to prevent any delays while typing. Checking the text of a syntax node is cheaper than checking the semantics of a node.
Therefore, the first check is whether the text of the node contains the word “Text” prior to checking that the type of node is the HyperLink control.
if (!syntax.ToString().ToLower().Contains("text"))
                return false;
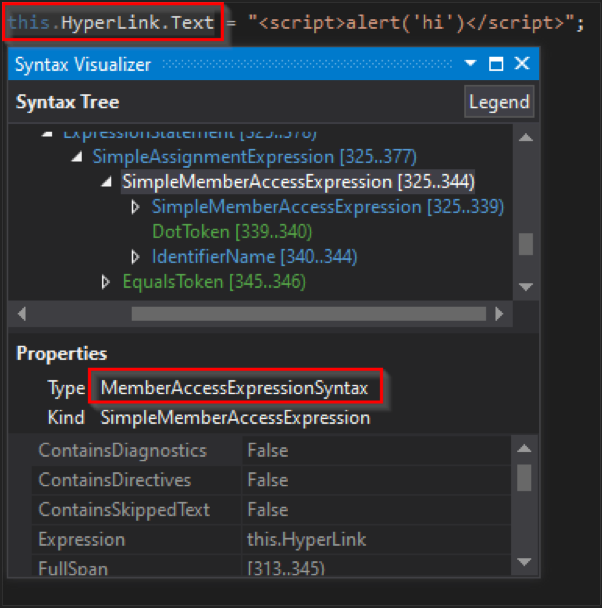
Next, we can examine if the left hand side of the expression is the same type of expression. But wait? What kind of expression is HyperLink.Text? We can find out by using the Syntax Visualizer provided by .NET Compiler Platform SDK.
Now we can check the left side of the assignment node to see if it matches that type.
 var leftSyntax = syntax?.Left as MemberAccessExpressionSyntax;

            if (leftSyntax == null)
 return false;
If we are able to get this far, there is a more cost efficient check that we should perform. We know that the left side is a MemberAccessExpression. This means that somewhere in the expression, the word “Text” appears. We can now check to see if the word “Text” is where we expect it to be. If this is an assignment to HyperLink’s Text property, we expect “Text” to be the identifier of the member being accessed in the MemberAccessExpression. We can check this by doing a string comparison as we did before. We can also combine this with our existing branch logic.
if (leftSyntax == null || leftSyntax.Name.Identifier.ValueText.ToLower() != "text")
                return false;
If the member being accessed is named “Text”, it’s a good time to perform the more expensive semantic check. We can check this type by using the GetSymbolInfo method from the SemanticModel. If it matches the full name and namespace of the HyperLink control, we will report the syntax node as vulnerable.
 if (!(leftSymbol != null && leftSymbol.ToString().StartsWith("System.Web.UI.WebControls.HyperLink.Text")))
                return false;

            return true;
Our expression syntax analyzer is complete, and we can have our analyzer call the IsVulnerable method. If the IsVulnerable returns true, a VulnerableSyntaxNode can be created based on the rule, and added to the collection of VulnerableSyntaxNodes.
The VulnerableSyntaxNode object has many constructors. However, for a vulnerable assignment expression, the left side would be the sink and the right hand side would be the source.
Prior to adding the result to the collection of vulnerable nodes, a guard condition should be added in case another thread has already added it to the collection.
if (VulnerableSyntaxNodes.All(p => p.Sink.GetLocation() != syntax?.Left.GetLocation()))
                VulnerableSyntaxNodes.Push(new VulnerableSyntaxNode(syntax.Left, syntax.Right));
What about the rule ID? Puma Scan handles mapping a rule ID to the analyzer via a class attribute. You will need to define a new Diagnostic in the DiagnosticId Enum, and add the attribute to the top of the analyzer class.
public enum DiagnosticId
    {
        None,
...

...
    SEC0121,
    SEC0122,
    SEC0123 // HyperLink Text Analyzer
}
[SupportedDiagnostic(DiagnosticId.SEC0123)]
  internal class HyperLinkTextAnalyzer : BaseCodeBlockAnalyzer, ISyntaxAnalyzer
  {
...
Now that you have a rule ID, you’ll want to define the text that displays in the Visual Studio Error window. In the Resource file, follow the naming convention of the resource keys to define four new keys.
Analyzer_SEC0123_Anchor sec0123-unencoded-hyperlink-text Analyzer_SEC0123_Description “Data is written to the browser using the raw HyperLink.Text method. This can result in Cross-Site Scripting (XSS) vulnerabilities if the data source is considered untrusted or dynamic (request parameters, database, web service, etc.).
HyperLink controls are often found in HTML contexts, but can also appear in other contexts such as JavaScript, HTML Attribute, or URL. Fixing the vulnerability requires the appropriate Web Protection Library (aka AntiXSS) context-specific method to encode the data before setting the HyperLink.Text property.”
Analyzer_SEC0123_MessageFormat Unencoded HyperLink.Text property value.
Analyzer_SEC0123_Title Unencoded HyperLink Text
Lastly, add the new analyzer to the existing suite factory.
public class WebFormsXssAnalyzerSuiteFactory : IAnalyzerSuiteFactory
   {
       public ImmutableArray<ICompilationAnalyzer> Create()
       {
           return new ICompilationAnalyzer[]
           {
               new LiteralTextAnalyzer(),
               new LabelTextAnalyzer(),
               new ResponseWriteAnalyzer(),
   new HyperLinkTextAnalyzer()
           }.ToImmutableArray();
       }
   }
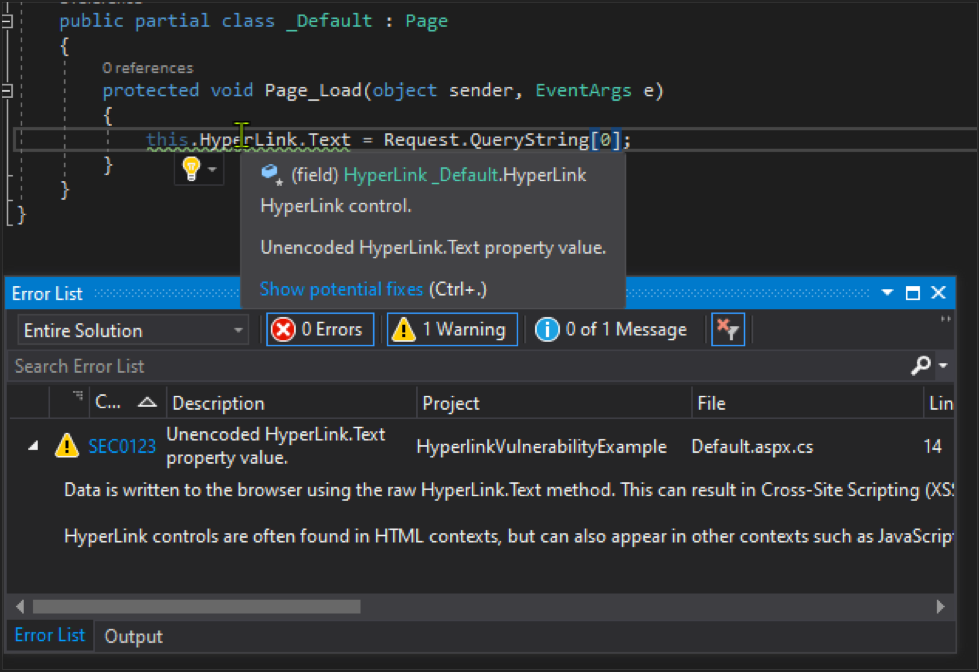
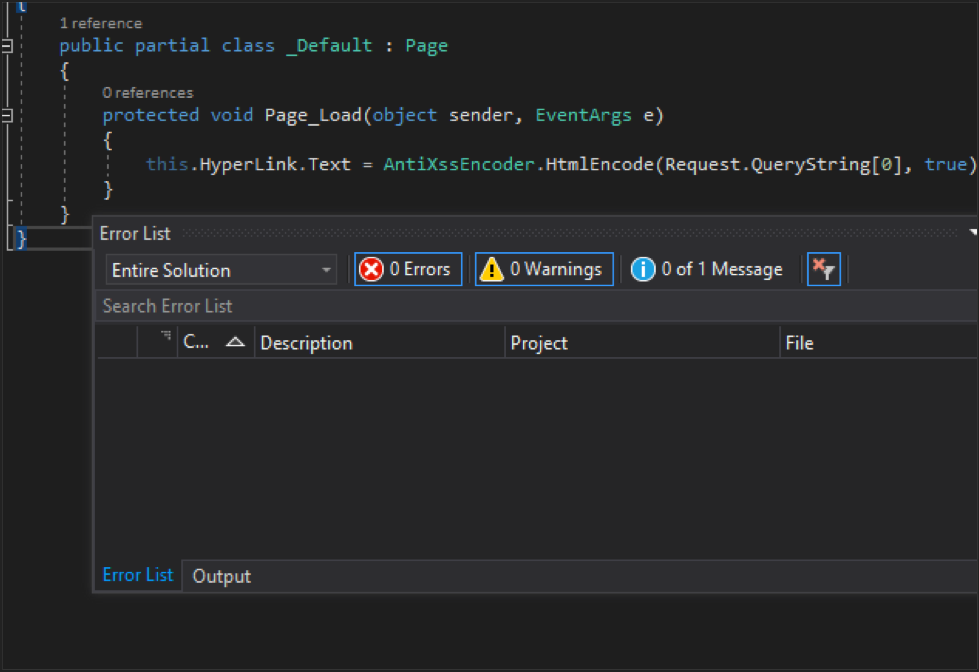
Once our code compiles, we run now run the Vsix project to test if our new rule works. The debugger will open an additional Visual Studio instance for you, called the experimental Visual Studio instance. With the experimental instance, you can open the target solution and see results of the new rule. If there are any vulnerable uses of the HyperLink control, you will see something like this:
We can now take our analyzer one step further. False positives are a huge annoyance in many current commercial scanning solutions. The Puma Scan Community Edition has some helper methods to help us accomplish this. When we find a potentially vulnerable assignment to HyperLink’s Text property, we can do further examination of the right side expression to weed out any false positives.
For example, if the right side of the assignment expression is a hard coded string, it would not be vulnerable due to the value of text never being assigned to something that could be controlled by an attacker. Puma Scan’s SyntaxNodeAnalyzerFactory can be used to create a SyntaxNodeAnalyzer specific to the type of node we want to reduce false positives. In this case, it will be whatever expression is on the right side of the assignment expression. The SyntaxNodeAnalyzer exposes two methods that can be used to evaluate whether the current node can be ignored.
The first method is CanIgnore
a. This method runs the syntax node through a whitelist of safe types
b. For example, a literal string is a safe type
The second method is CanSuppress
a. This method runs the syntax node through a list of whitelisted sanitizers
b. For example, it will check to see if the syntax node ran through a anti-cross site scripting encoder
var expressionAnalyzer = SyntaxNodeAnalyzerFactory.Create(syntax.Right);
           if (expressionAnalyzer.CanIgnore(model, syntax.Right))
               return false;
           if (expressionAnalyzer.CanSuppress(model, syntax.Right, ruleId))
               return false;

           return true;
If we wrap our vulnerable example from above with an anti-cross site scripting method, the security warning will go away. The same would be true if we assigned HyperLink.Text to something that isn’t corruptible, like a hard coded value.
Now what? Tailor rules to your own team. Create rules that aren’t security related, and keep going! Submit PRs for rules that you think would be useful to the community. Perhaps you have an idea for a rule, but you aren’t quite sure how to tackle it. Or you have a crazy deadline at work and don’t have time. In that case, submit an issue on github, and maybe one of our contributors will dive in. The Team at Puma Security is working hard to continuously add rules as well.
Interested in Cloud security, security automation, and finding vulnerabilities like SSRF, Command Injection, and Path Traversal? Contact us today: sales [at] pumasecurity [dot] io. Make sure to follow our social channels, @puma_scan on twitter and @puma-security-llc on linked in.
Eric Mead’s experience includes application security automation, cloud security reviews, static source code analysis, penetration testing, SDLC consulting, and secure code review assessments. As a co-founder of Puma Security, his passion lies in modern static analysis product development and DevSecOps automation.
