blog
AWS re:Invent 2025 saw several new security capabilities added for security teams to use in their AWS architecture designs. One of these new capabilities, IAM Outbound Identity Federation, addresses a missing piece in our open source Nymeria cross-cloud workload identity project design. This blog explores the AWS IAM Outbound Identity Federation configuration and the changes we’ve made to Nymeria, allowing a virtual machine running in AWS to access external cloud resources using an AWS-signed OpenID Connect identity token.
Unlike Google Cloud’s workload identity pool AWS provider, Azure managed identity does not support IAM authentication with pre-signed URLs. Azure managed identity only supports external OpenID Connect (OIDC) providers, which means that workloads running in AWS could not federate into an Azure environment without using another service that can convert OIDC tokens (e.g., AWS EKS or Cognito).
Up until now, the Puma Security Nymeria cross-cloud workload identity project had examples for federating from AWS Lambda functions and EKS pods into both Azure and Google Cloud storage resources. With the 2025 pre:Invent release of IAM Outbound Identity Federation, we’ve now added support for an AWS EC2 instance to federate into an Azure storage resource.
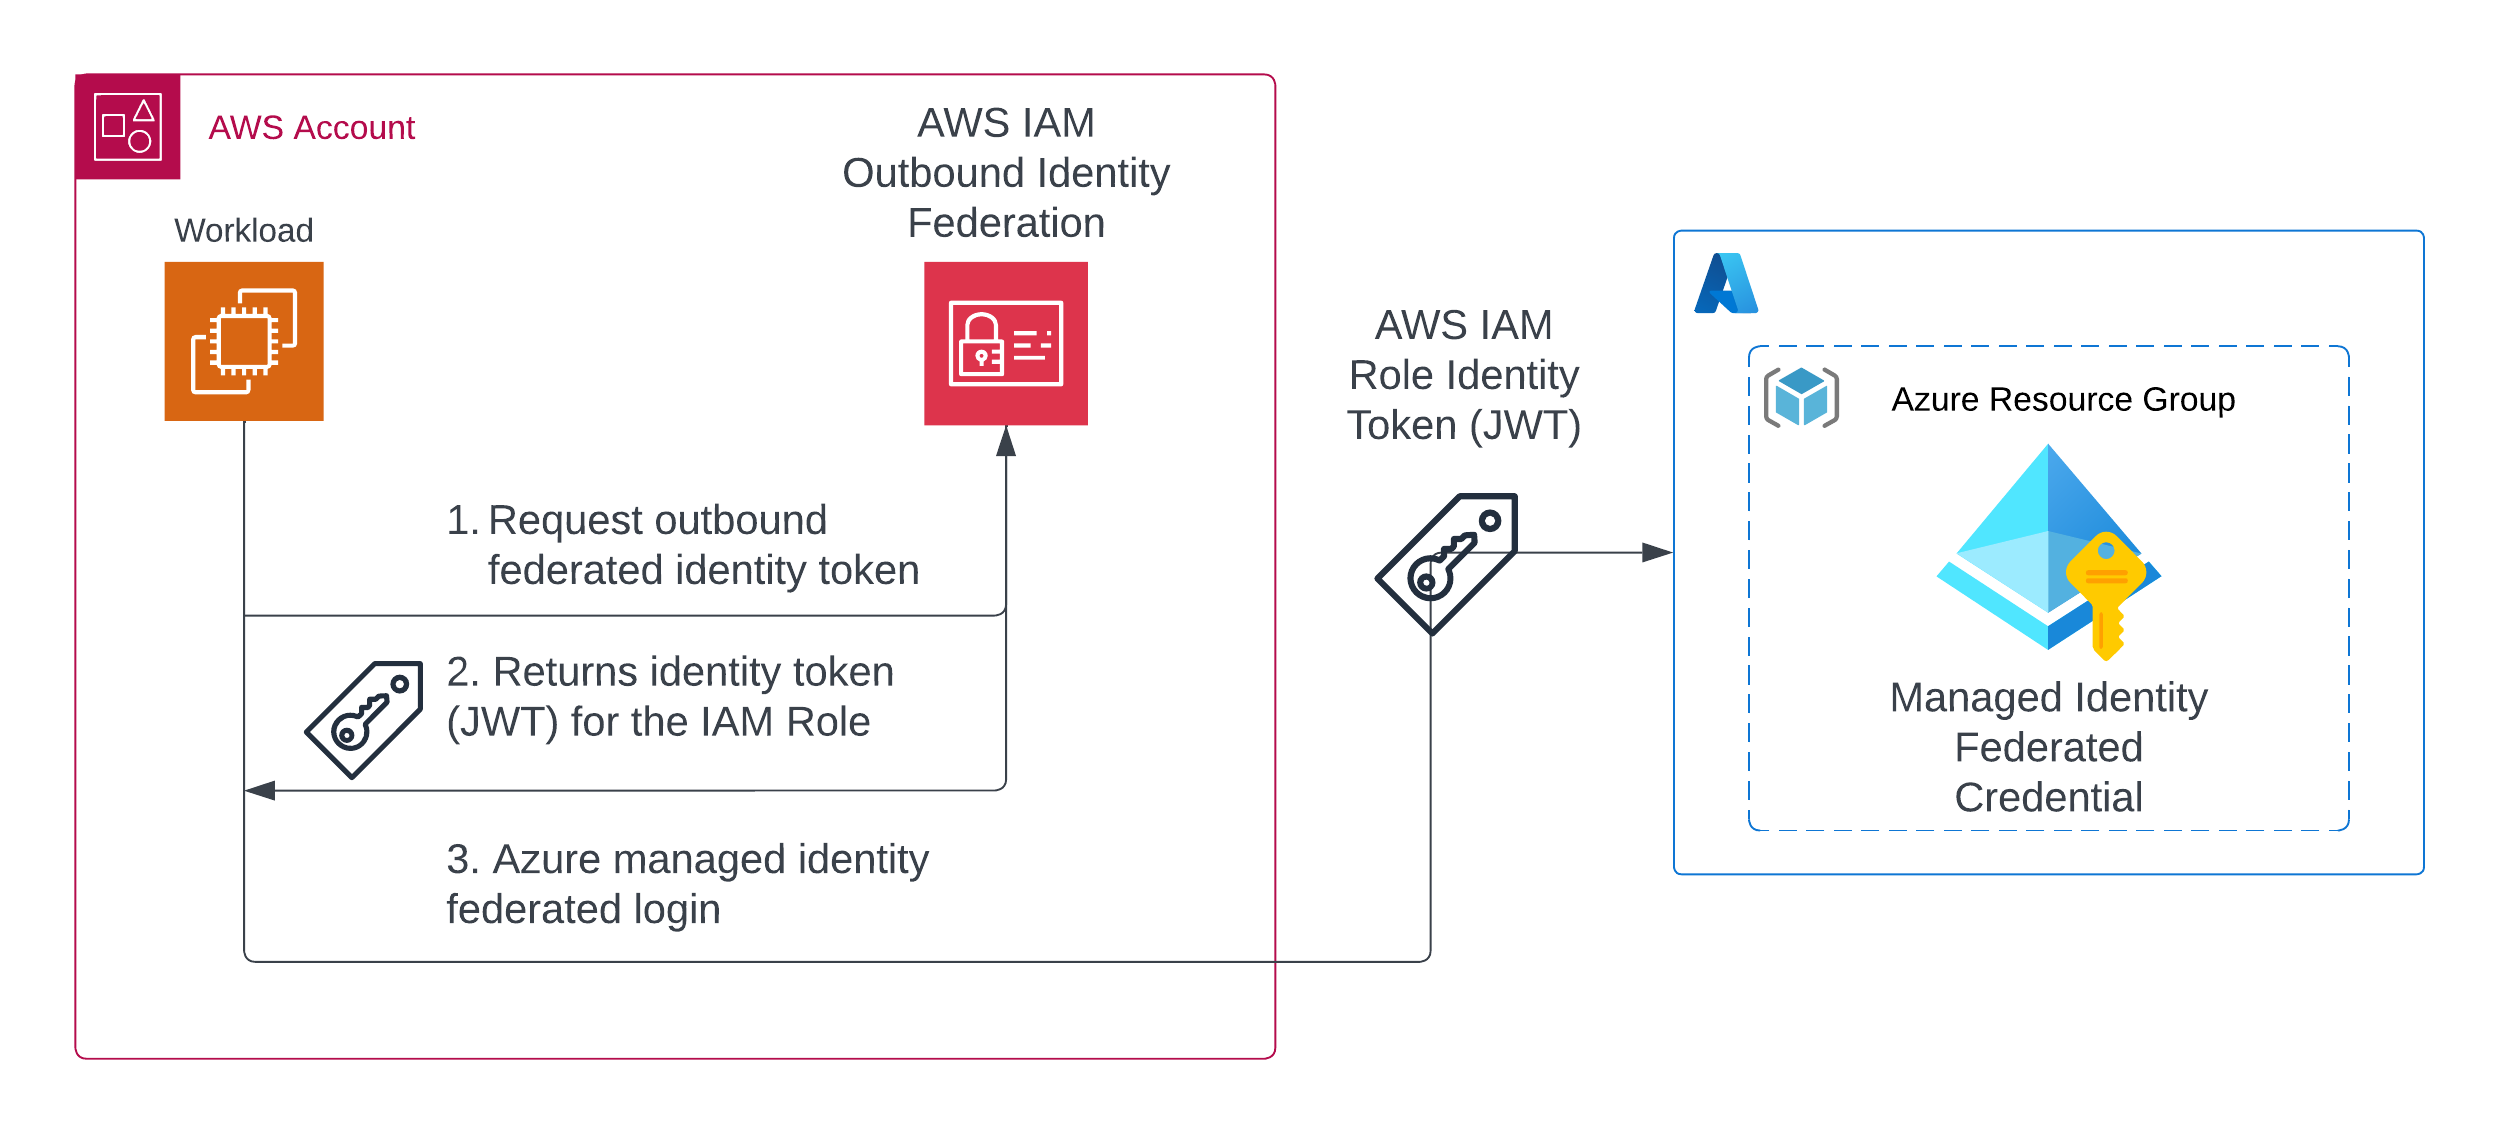
The following diagram illustrates the architecture design for an AWS EC2 instance using AWS Outbound Identity Federation to access an Azure Blob storage container. The EC2 instance can now request a signed OIDC token from AWS IAM using the sts:GetWebIdentityToken API. The AWS-signed OIDC token can then be used to log in to the Azure tenant’s user-assigned managed identity. Finally, the EC2 instance can use the Azure access token to access the storage container and blob objects.
Before you can use the AWS IAM Outbound Identity Federation feature, you must enable the Outbound Identity Federation capability in your AWS account. This can be done using the AWS Management Console or the AWS Terraform provider’s (v6.26.0 or later) new aws_iam_outbound_web_identity_federation resource.
# enables account level web identity federation
resource "aws_iam_outbound_web_identity_federation" "this" {}
After applying the configuration, you will see that the Outbound Identity Federation feature is enabled in the AWS IAM console, and a unique Token Issuer URL is generated for your AWS account. The token issuer URL will be important later when we configure the Azure managed identity’s trust relationship.

To use the Outbound Identity Federation feature, create an AWS IAM role and an instance profile to attach to the EC2 instance. The role’s permissions need to include the sts:GetWebIdentityToken permission to request an outbound identity token from AWS IAM.
The following Terraform configuration shows how to create an IAM policy document that includes the sts:GetWebIdentityToken permission.
data "aws_iam_policy_document" "cross_cloud" {
  statement {
    sid    = "AllowTokenVending"
    effect = "Allow"
    actions = [
      "sts:GetWebIdentityToken",
    ]
    resources = [
      "*",
    ]
  }
}

resource "aws_iam_policy" "cross_cloud" {
  name        = "nymeria-cross-cloud-token-${random_string.unique_id.result}"
  path        = "/"
  description = "IAM policy for Nymeria VM"
  policy      = data.aws_iam_policy_document.cross_cloud.json

  tags = {
    Product = "Nymeria"
  }
}
With the EC2 instance running, connect to the instance using the SSM session manager or using SSH. Once connected, use the AWS CLI to request an outbound federated identity token with the following attributes:
aws sts get-web-identity-token --audience api://AzureADTokenExchange --signing-algorithm RS256 --duration-seconds 300
The output will show the signed OIDC token in the WebIdentityToken attribute and the token’s expiration time in the Expiration attribute.
{
    "WebIdentityToken": "eyJraWQiOiJSU0FfMCIsInR5cCI6IkpXVCIsImFsZyI6IlJTMjU2In0...",
    "Expiration": "2025-12-19T04:06:07.577000+00:00"
}
Now that we know how to request an AWS outbound identity token, we can configure the Azure managed identity to trust the AWS outbound identity provider. This involves extracting the necessary claims from the AWS identity token and using those claims to configure the Azure managed identity’s federated credentials.
Start by decoding the AWS identity token using jq. We will need to extract the token’s iss (issuer) and sub (subject) claims to configure the Azure managed identity’s trust relationship.
JWT=$(aws sts get-web-identity-token --audience api://AzureADTokenExchange --signing-algorithm RS256 --duration-seconds 300 | jq -r '.WebIdentityToken')

jq -R 'split(".") | .[1] | @base64d | fromjson' <<< $JWT
The decoded token payload will look similar to the following example. The subject (sub) claim uniquely identifies the AWS IAM Role that the token was create for, the issuer (iss) points to the AWS account’s outbound federated identity provider, and audience (aud) points to the service that will be consuming the token (in this case Azure). The AWS outbound federation token also includes additional AWS metadata in the https://sts.amazonaws.com/ claim, including the AWS VPC ID, Organization Id AWS account ID, OU Path, source region, source instance, and principal tags. These additional claims can be used to create advanced claim filters when configuring trust relationships with other cloud providers.
Note: Azure’s managed identity federation does not support advanced claim filters, such as those found in the https://sts.amazonaws.com/ claim. Only the iss, aud, sub claims will be needed when configuring Azure managed identity’s trust configuration below.
{
  "aud": "api://AzureADTokenExchange",
  "sub": "arn:aws:iam::123456789012:role/nymeria-cross-cloud-9zo9h8c5",
  "https://sts.amazonaws.com/": {
    "ec2_instance_source_vpc": "vpc-1234567890123456",
    "ec2_role_delivery": "2.0",
    "org_id": "o-abcd1234",
    "aws_account": "123456789012",
    "ou_path": [
      "o-abcd1234/r-abc/ou-abc-def/"
    ],
    "original_session_exp": "2025-12-19T10:21:06Z",
    "source_region": "us-east-2",
    "ec2_source_instance_arn": "arn:aws:ec2:us-east-2:123456789012:instance/i-12345678901234567",
    "principal_id": "arn:aws:iam::123456789012:role/nymeria-cross-cloud-9zo9h8c5",
    "principal_tags": {
      "Product": "Nymeria"
    },
    "ec2_instance_source_private_ipv4": "10.142.128.107"
  },
  "iss": "https://53e20c38-5c03-41f7-8baa-a67e81974de0.tokens.sts.global.api.aws",
  "exp": 1766118898,
  "iat": 1766118598,
  "jti": "1640bab7-b35b-4410-b4ee-04d219abbf33"
}
To establish trust in the Azure tenant, start by creating a user assigned managed identity in a resource group with permissions to read data from the cross cloud storage account.
The following Terraform configuration uses the azurerm_user_assigned_identity resource to create the user assigned managed identity. Then, the azurerm_role_assignment resource grants the Storage Blob Data Reader role to the managed identity to read data from the cross cloud storage account.
resource "azurerm_user_assigned_identity" "cross_cloud" {
  name                = "cross-cloud-vm-${random_string.unique_id.result}"
  location            = var.location
  resource_group_name = azurerm_resource_group.federated_identity.name
}

resource "azurerm_role_assignment" "cross_cloud_blob_reader" {
  principal_id         = azurerm_user_assigned_identity.cross_cloud.principal_id
  scope                = azurerm_storage_account.cross_cloud.id
  role_definition_name = "Storage Blob Data Reader"
}
Finally, configure the user assigned managed identity’s federated credentials to trust the AWS outbound identity provider. The var.aws_account_issuer variable is set to the AWS accounts issuer https://53e20c38-5c03-41f7-8baa-a67e81974de0.tokens.sts.global.api.aws. The var.aws_iam_role_arn variable is set to the AWS IAM role ARN arn:aws:iam::123456789012:role/nymeria-cross-cloud-9zo9h8c5.
resource "azurerm_federated_identity_credential" "aws" {
  name                = "nymeria-aws"
  resource_group_name = var.azure_resource_group_name
  parent_id           = var.azure_managed_identity_id

  issuer   = var.aws_account_issuer
  audience = ["api://AzureADTokenExchange"]
  subject  = var.aws_iam_role_arn
}
With the AWS outbound identity federation and Azure managed identity trust relationship configured, the EC2 instance can now access the Azure Blob storage container. To test the access to the storage instance, start by requesting a new AWS outbound identity token and storing the value in an environment variable called JWT.
JWT=$(aws sts get-web-identity-token --audience api://AzureADTokenExchange --signing-algorithm RS256 --duration-seconds 300 | jq -r '.WebIdentityToken')
Then, set the following environment variables to your Azure tenant id, user assigned managed identity client id, and the name of the storage account.
export AZURE_TENANT_ID="your-azure-tenant-id"
export AZURE_MANAGED_IDENTITY_CLIENT_ID="your-managed-identity-client-id"
export AZURE_STORAGE_ACCOUNT="your-cross-cloud-storage-account"
Finally, run the az login command to authenticate to the Azure tenant using the AWS outbound identity token. After successfully logging in, use the az storage blob list command to list the blobs in the storage container.
az login --service-principal --tenant $AZURE_TENANT_ID --username $AZURE_MANAGED_IDENTITY_CLIENT_ID --federated-token $JWT
The output will confirm that you have successfully authenticated into the Azure tenant using the AWS outbound identity token.
[
  {
    "cloudName": "AzureCloud",
    "homeTenantId": "your-azure-tenant-id",
    "id": "your-azure-subscription-id",
    "isDefault": true,
    "managedByTenants": [],
    "name": "your-azure-subscription-name",
    "state": "Enabled",
    "tenantId": "your-azure-tenant-id",
    "user": {
      "name": "your-managed-identity-client-id",
      "type": "servicePrincipal"
    }
  }
]
Finally, list the blobs in the Azure storage account container to confirm that access to the storage account is working as expected.
az storage blob list --auth-mode login --account-name $AZURE_STORAGE_ACCOUNT --container-name assets | jq '.[].name'
AWS IAM Outbound Identity Federation provides a new way for workloads running in AWS to securely access external cloud resources using short-lived, signed OIDC tokens. With the addition of this new feature, the Puma Security Nymeria cross-cloud workload identity project now supports federating from AWS EC2 instances into both Azure and Google cloud storage resources.
Wiz Blog: Top AWS re:Invent Announcements for Security Teams in 2025 by Scott Piper
AWS News Blog: Simplify access to external services using AWS IAM Outbound Identity Federation
Terraform: new aws_iam_outbound_web_identity_federation resource
Would you like to learn more about AWS and IAM security? Contact us today: sales [at] pumasecurity [dot] com.
Eric Johnson’s experience includes performing cloud security architecture and design, cloud native and Kubernetes assessments, infrastructure as code automation, application security automation, web and mobile application penetration testing, secure development lifecycle consulting, and secure code review assessments.
